Tuesday, December 28, 2010

Merry Christmas...Joy to the World!


Tiramisu Cupcakes!

Singing...."Joy to the World........"

What didn't I make for Christmas? I made like many of you out there in Bake Land: Cookies, Cupcakes, cakes, more cookies.....LOL.  It was truly a crazy time.  I spent nights measuring, baking, decorating, sprinkling...and the worst ever cleaning.  Ugh!  That's the only part I hate.  Cleaning the baking pans and pastry tips is the worst.  I spend more time cleaning than baking sometimes!!! hahahaha!

So for this Christmas, me and my sink became best friends.  My poor nails, my poor sleep...ha!  Okay-okay, but I figure, its all worth it.  See what I mean below.......  TADA!

These are Tiramisu Cupcakes! 


So this is actually a cake recipe that I turned into cupcakes.  They came out perfect and I decorated them as white Christmas trees with sprinkles.  Okay so the recipe calls for half of the cake batter to be mixed with instant coffee and I did this but I added the white cake batter first and then added the coffee batter on top of the cupcake.  It makes a pretty cake. Coffee flavored cake on top and the White Cake at the bottom. 


Okay so then the cupcake calls for a marscapone cheese filling so what I did with this was add this as a filling with the handy Wilton Tip No. 230.  The frosting is made with cream and it resembles whip cream but thicker and yummier! The recipe I got from Allrecipes.com.  It's called Tiramisu Layer Cake.  I made mini versions and regular versions.  I used some crunch sprinkles but you can use any other type of cute sprinkles!    I used Duncan Hines for the cake.  It makes it sooo much more easier to use box cake sometimes and for that I thank DH...hahahaha! 

I made these to give these as presents for the Holiday's.  My friends sure did enjoy them and I did also...Hee-hee!

Ingredients


CAKE:

• 1 (18.25 ounce) package moist white cake mix
• 1 teaspoon instant coffee powder
• 1/4 cup coffee
• 1 tablespoon coffee flavored liqueur

FILLING: (This I used as the filling)


• 1 (8 ounce) container mascarpone cheese
• 1/2 cup confectioners' sugar
• 2 tablespoons coffee flavored liqueur

FROSTING:


• 2 cups heavy cream
• 1/4 cup confectioners' sugar
• 2 tablespoons coffee flavored liqueur

GARNISH:


• 2 tablespoons unsweetened cocoa powder
• 1 (1 ounce) square semisweet chocolate


Directions


1. Preheat oven to 350 degrees F (175 degrees C). Grease and flour 3 (9 inch) pans.


2. Prepare the cake mix according to package directions. Divide two thirds of batter between 2 pans. Stir instant coffee into remaining batter; pour into remaining pan.


3. Bake in the preheated oven for 20 to 25 minutes, or until a toothpick inserted into the center of the cake comes out clean. Let cool in pan for 10 minutes, then turn out onto a wire rack and cool completely. In a measuring cup, combine brewed coffee and 1 tablespoon coffee liqueur; set aside.


4. To make the filling: In a small bowl, using an electric mixer set on low speed, combine mascarpone, 1/2 cup confectioners' sugar and 2 tablespoons coffee liqueur; beat just until smooth. Cover with plastic wrap and refrigerate.


5. To make the frosting: In a medium bowl, using an electric mixer set on medium-high speed, beat the cream, 1/4 cup confectioners' sugar and 2 tablespoons coffee liqueur until stiff. Fold 1/2 cup of cream mixture into filling mixture.


6. To assemble the cake: Place one plain cake layer on a serving plate. Using a thin skewer, poke holes in cake, about 1 inch apart. Pour one third of reserved coffee mixture over cake, then spread with half of the filling mixture. Top with coffee-flavored cake layer; poke holes in cake. Pour another third of the coffee mixture over the second layer and spread with the remaining filling. Top with remaining cake layer; poke holes in cake. Pour remaining coffee mixture on top. Spread sides and top of cake with frosting. Place cocoa in a sieve and lightly dust top of cake. Garnish with chocolate curls. Refrigerate at least 30 minutes before serving.


7. To make the chocolate curls, use a vegetable peeler and run it down the edge of the chocolate bar. (I didn't use this.)




Monday, December 6, 2010

Thank Goodness for Baking!

HAPPY THANKSGIVING!


This year has been blow after blow and I honestly didn't think that I was going to be in the Thanksgiving mood, but after I started to bake. Wow, did I get myself back!!!! I got laid off this year and have been really depressed with just life and worried about what to do with my life. I mean I don't have it as bad but I worked at this place for more than 10 years and did enjoy it so when I got laid off, it was devastating. I began this baking fest thinking, ughhhhh but once I got "it" back, it just made me be thankful that I have talent for baking and how much love and how great I feel when I do it.

I have even been approached by a friend to work a Mary Kay party in Dec.,  so I am super excited because this is only the beginning. So I am very Thankful for what's to come and thankful that I have this passion.  And Thankful that life works in mysterious ways!


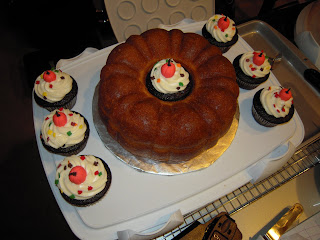
I made cupcakes and a Rum cake for Thanksgiving Day Dinner! This was a fun baking adventure. I made two Rum cakes and about a dozen chocolate cupcakes. The Rum cakes I make every year so it was like riding a bike but the cupcakes...... It's yummy but the Chocolate Cupcakes...OMG! They were amazing!

I can't believe that its taken me so long to try this recipe. They were soooo choco-licious! And they matched perfectly with my cream cheese frosting. Yeah the same one I make in the other blogs.....hahahaha! Trust me the next post will be different. 

Okay so the recipes I got from one of my favorite websites, All Recipes.com
The cupcakes were made from a recipe called Black Magic Cake Recipe and you can click on the name for the recipe.  Black Magic Cake Recipe.
I used the harvest sprinkles and the cute little pumpkins were made from fondant. 

The recipe for the Golden Rum Cake you can find  by clicking the link here.. Golden Rum Cake

I really like the fact that you can read reviews and get other bakers input and advice.  This website is the best. 

I cannot wait for Christmas now.  I will be making Christmas Cookies next.  Keep you posted on how they come out.  But for now, see below for the recipes. 

Golden Rum Cake
Ingredients


1 cup chopped walnuts (I didn't use the walnuts this time)


1 (18.25 ounce) package yellow cake mix


1 (3.4 ounce) package instant vanilla pudding mix


4 eggs


1/2 cup water


1/2 cup vegetable oil


1/2 cup dark rum (I used Flor de Cana...yum!)


1/2 cup butter


1/4 cup water


1 cup white sugar


1/2 cup dark rum


Directions


1.Preheat oven to 325 degrees F (165 degrees C). Grease and flour a 10 inch Bundt pan. Sprinkle chopped nuts evenly over the bottom of the pan.


2.In a large bowl, combine cake mix and pudding mix. Mix in the eggs, 1/2 cup water, oil and 1/2 cup rum. Blend well. Pour batter over chopped nuts in the pan.


3.Bake in the preheated oven for 60 minutes, or until a toothpick inserted into the cake comes out clean. Let sit for 10 minutes in the pan, then turn out onto serving plate. Brush glaze over top and sides. Allow cake to absorb glaze and repeat until all glaze is used.


4.To make the glaze: in a saucepan, combine butter, 1/4 cup water and 1 cup sugar. Bring to a boil over medium heat and continue to boil for 5 minutes, stirring constantly. Remove from heat and stir in 1/2 cup rum.


Black Magic Cake
Ingredients


1 3/4 cups all-purpose flour


2 cups white sugar


3/4 cup unsweetened cocoa powder


2 teaspoons baking soda


1 teaspoon baking powder


1 teaspoon salt


2 eggs


1 cup strong brewed coffee (I used Starbucks)


1 cup buttermilk


1/2 cup vegetable oil


1 teaspoon vanilla extract


Directions


1.Preheat oven to 350 degrees F (175 degrees C). Grease and flour two 9 inch round cake pans or one 9x13 inch pan.


2.In large bowl combine flour, sugar, cocoa, baking soda, baking powder and salt. Make a well in the center.


3.Add eggs, coffee, buttermilk, oil and vanilla. Beat for 2 minutes on medium speed. Batter will be thin. Pour into prepared pans.


4.Bake at 350 degrees F (175 degrees C) for 30 to 40 minutes, or until toothpick inserted into center of cake comes out clean. Cool for 10 minutes, then remove from pans and finish cooling on a wire rack. Fill and frost as desired.


Baby Shower Cupcakes!

Posted by Picasa
WOW, I know its been a while since I posted a blog but things have been soooo crazy for me. Its been such a rollarcoaster of year. You wouldn't even believe it if I told you everything that has happened to me. Let's just say this year has been so stressful followed by more stress. All this stressed turned into this crazy depression and then I couldn't even sleep at night. It was crazy! I wasn't baking because I was just not in the mood. Not sure if that's ever happened to you but I just roamed around, watched TV, slept and just wanted to hibernate. So now I am back. I feel better now. So my husband decides to get on the health wagon and I have been working out alot more so the cookies, breads and brownies were put on hold. So I have been hoping that I get invited to a party or asked for a cake in order to bake something.  So when my sister's friend asked me to bake some cupcakes for her baby shower, I was soooooo happy! A big plus!  FINALLY I AM BAKING AGAIN! Oh and I got paid for this too!  Double PLUS!!!!

The picture above shows the cupcakes ready for pick up.  I procrastinated so much on making these cupcakes that I started to run out of time but thankfully they came out sooo cute.

The recipe I used was from The Cake Doctor.  I made Chocolate Cupcakes!  Super Simple but super cute.  I made my famous cream cheese frosting that I always make because its soo good and I am not really fond of buttercream especially when I make cupcakes to sell.  This is an order so I want to make it a bit nicer than just butter and powdered sugar.  Cream cheese makes everything so much better tasting, don't you agree?
I made the little onesies and bids from fondant.  Aren't they cutie?


Brooklyn Blackout Cupcakes
•1 package (18.25 oz) plain devil's cake mix


•3 tablespoons Dutch process unsweetened cocoa


•1 1/2 cups buttermilk


•1/2 cup vegetable oil


•3 large eggs


•1 teaspoon pure vanilla extract


1.Place a rack in the center of the oven and preheat the oven to 350 degrees.


2.Prepare the cupcake batter: Line 24 cupcake cups with paper liners. Set the pans aside.


3.Place the cake mix, cocoa powder, buttermilk, oil, eggs, and vanilla in a large mixing bowl. Blend with an electric mixer on low speed for 30 seconds. Stop the machine and scrape down the sides of the bowl with a rubber spatula. Increase the mixer speed to medium beat two minutes more.


4.Spon or scoop a heaping 1/2 cup batter into each lined cup, filling it 2/3 of the way full. Place the pans in the oven.


5.Bake the cupcakes until they spring back when lightly pressed with your finger, 17-20 minutes.


6.Remove the pans from the oven and place them on wire racks to cool.


Thursday, July 22, 2010

Overnight Cinnamon Rolls...OMG!


Did I mention how much I love Cinnamon Rolls...well really anything with cinnamon.  I even put cinnamon in my coffee this is how much I love it.  The best part of Cinnamon is when your baking and you can smell it all over the house.  I go to heaven every time I smell this so I love baking with it often.  This is my first, yes MY FIRST ATTEMPT at making homemade Cinnamon Rolls.  And I mean this is totally from scratch, the dough and the rest.  Wow, I am impressed with myself!  Look how wonderful it looks.  I mean I don't think I did a bad job and they tasted amazing!!!  Look at them....Look what I have created!!  OMG.....HAHAHA! Anyways I searched and searched for a recipe and settled on the Alton Brown's Overnight Cinnamon Rolls that I found on Food Network.com.  
Right Out of the Oven
I mainly choose this recipe because it was easy but it also included a very helpful video from Alton's show Good Eats. I love that show! So Yeaheee for me and yeaheee for you if you try this recipe and need the assistance of the video.  :)  
Okay so the only part that made me go,  OMG was that you have to wait overnight before baking them.  I mean the name says it all right?  But if you are impatient like me then you will be like OMG when you read the recipe instructions but I guess this is why they taste so amazing and I guess you do have to wait for the dough to rise.  Duh!  hahahah!  Okay so here's the recipe.  I used my own recipe for the cream cheese frosting.  It's the same one I used in Carrot Cake recipe.  It fit perfectly with these Cinnamon roll. YUMMY! Okay here's the recipe!  Oh yeah, don't forget to watch the video!  It's super helpful!   Well any questions or comments, please let me know.  Happy Baking! 

Ingredients

Dough:

  • 4 large egg yolks, room temperature
  • 1 large whole egg, room temperature
  • 2 ounces sugar, approximately 1/4 cup
  • 3 ounces unsalted butter, melted, approximately 6 tablespoons
  • 6 ounces buttermilk, room temperature
  • 20 ounces all-purpose flour, approximately 4 cups, plus additional for dusting
  • 1 package instant dry yeast, approximately 2 1/4 teaspoons
  • 1 1/4 teaspoons kosher salt
  • Vegetable oil or cooking spray

Filling:

  • 8 ounces light brown sugar, approximately 1 cup packed
  • 1 tablespoon ground cinnamon
  • Pinch salt
  • 3/4-ounce unsalted butter, melted, approximately 1 1/2 tablespoons

Icing:

  • 2 1/2 ounces cream cheese, softened, approximately 1/4 cup
  • 3 tablespoons milk
  • 5 1/2 ounces powdered sugar, approximately 1 1/2 cups

Directions

For the dough: in the bowl of a stand mixer with the whisk attachment, whisk the egg yolks, whole egg, sugar, butter, and buttermilk. Add approximately 2 cups of the flour along with the yeast and salt; whisk until moistened and combined. Remove the whisk attachment and replace with a dough hook. Add all but 3/4 cup of the remaining flour and knead on low speed for 5 minutes. Check the consistency of the dough, add more flour if necessary; the dough should feel soft and moist but not sticky. Knead on low speed 5 minutes more or until the dough clears the sides of the bowl. Turn the dough out onto a lightly floured work surface; knead by hand about 30 seconds. Lightly oil a large bowl. Transfer the dough to the bowl, lightly oil the top of the dough, cover and let double in volume, 2 to 2 1/2 hours.
Combine the brown sugar, cinnamon and salt in a medium bowl. Mix until well incorporated. Set aside until ready to use.
Butter a 9 by 13-inch glass baking dish. Turn the dough out onto a lightly floured work surface. Gently shape the dough into a rectangle with the long side nearest you. Roll into an 18 by 12-inch rectangle. Brush the dough with the 3/4-ounce of melted butter, leaving 1/2-inch border along the top edge. Sprinkle the filling mixture over the dough, leaving a 3/4-inch border along the top edge; gently press the filling into the dough. Beginning with the long edge nearest you, roll the dough into a tight cylinder. Firmly pinch the seam to seal and roll the cylinder seam side down. Very gently squeeze the cylinder to create even thickness. Using a serrated knife, slice the cylinder into 1 1/2-inch rolls; yielding 12 rolls. Arrange rolls cut side down in the baking dish; cover tightly with plastic wrap and store in the refrigerator overnight or up to 16 hours.
Remove the rolls from the refrigerator and place in an oven that is turned off. Fill a shallow pan 2/3-full of boiling water and set on the rack below the rolls. Close the oven door and let the rolls rise until they look slightly puffy; approximately 30 minutes. Remove the rolls and the shallow pan of water from the oven.
Preheat the oven to 350 degrees F.
When the oven is ready, place the rolls on the middle rack and bake until golden brown, or until the internal temperature reaches 190 degrees F on an instant-read thermometer, approximately 30 minutes.
While the rolls are cooling slightly, make the icing by whisking the cream cheese in the bowl of a stand mixer until creamy. Add the milk and whisk until combined. Sift in the powdered sugar, and whisk until smooth. Spread over the rolls and serve immediately.

Wednesday, July 7, 2010

Chewy Oatmeal Blondies!!!

~Chewy Oatmeal Blondies~


Oatmeal Blondies.....I wouldn't believe it if you told me that these were going to taste so awesome but they were mmm....mmmm....good!  So although my hubby loves the sweeter stuff I make, like cupcakes, cookies and cakes---he feels better if he eats something that has oatmeal or fruits soooo I made a search for oatmeal desserts and I found this one.  :o)  I was so tired of making Oatmeal cookies already.  

So I found the recipe on the Paris Pastry Blog  and rated it a 5 out of 5  on her blog so that did it...... Oatmeal Blondies will be baked!  This is Martha Stewart's recipe also.  Look at how amazing they came out.....YUMMY! 

I think next time I will add some dired fruit or some chocolate chips to it.  Its already sweet but  what the hell.....right?  LOL


Chewy Oatmeal Blondies recipe: Martha Stewart - Everyday Food


Ingredients:

- 1 cup all-purpose flour

- ½ cup sugar

- 1 teaspoon baking powder

- ½ teaspoon salt

- ½ cup (1 stick) unsalted butter, room temperature

- ½ cup packed light-brown sugar

- 1 large egg

- 1 cup old-fashioned rolled oats (not quick-cooking)


Instructions:

- In a large bowl, whisk together flour, sugar, baking powder, and salt.

- Preheat oven to 350 degrees. Brush an 8-inch square baking pan with butter. (I used a larger rectangular tin, so I made 1.5 times the recipe) Line bottom and two sides with a strip of parchment paper, leaving a 2-inch overhang on both sides. Butter paper, and set pan aside.

- Using an electric mixer, beat butter and sugar until light and fluffy. Add egg, and beat until combined. With mixer on low, gradually add Baking Mix; mix just until combined. Mix in ¾ cup oats. Pour batter into prepared pan.

- Using an offset metal spatula or table knife, smooth batter evenly. Sprinkle with remaining oats, pressing gently to adhere. Bake until a toothpick inserted in center comes out with only a few moist crumbs attached, 30 to 35 minutes. Let cool in pan 30 minutes.

- Using overhang, transfer blondie (still on paper) to a wire rack to cool completely. Place on a cutting board (peel off paper); using a serrated knife, cut into 16 squares. Store blondies in an airtight container at room temperature for up to 2 days, or freeze for up to 2 months.


Wednesday, May 5, 2010

10PM Oatmeal Raisin Cookies!!!

OATMEAL RAISIN COOKIES! 


Your probably wondering why 10PM? Well that's because my hubby asked me for these oatmeal cookies at 10PM.  His request, Oatmeal Raisin Cookies.  I didn't hesitate to bake so I made the recipe on the Quaker Package. 

The recipe is called Vanishing Oatmeal Raisin Cookies.  It's the recipe on the package.  I have made these before but this time they came out sooo much better. 

What I did differently was use a Ice Cream scoop to drop the dough on the cookie sheet.  They came out bigger and in my opinion BETTER cookie to enjoy!  :0))  I made some coffee for my hubby and he enjoyed not one, but two of these yummy treats.  I ate one and now I will probably not sleep all night because of the sugar.   My hubby on the other hand drinks coffee every night, eats what-ever he wants and goes to sleep like a baby!   Anyways, the best part of baking these cookies-THE SMELL!  OMG, it makes it all worth it!  That Cinnamon Smell...Yummy!   Okay so they taste amazing also!  Picture Time! 


Ready to Bake!
Cooling Down.....
Plate and Serve......YUMMY! 
Ingredients

1/2 cup (1 stick) plus 6 tablespoons butter, softened

3/4 cup firmly packed brown sugar

1/2 cup granulated sugar

2 eggs

1 teaspoon vanilla

1-1/2 cups all-purpose flour

1 teaspoon baking soda

1 teaspoon ground cinnamon

1/2 teaspoon salt (optional)

3 cups Quaker® Oats (quick or old fashioned, uncooked)

1 cup raisins
 
Preparation

Heat oven to 350°F. In large bowl, beat butter and sugars on medium speed of electric mixer until creamy. Add eggs and vanilla; beat well. Add combined flour, baking soda, cinnamon and salt; mix well. Add oats and raisins; mix well.
Drop dough by rounded tablespoonfuls onto ungreased cookie sheets.
Bake 8 to 10 minutes or until light golden brown. Cool 1 minute on cookie sheets; remove to wire rack. Cool completely. Store tightly covered.

Prep Time: 20 min

Cook Time Time: 08 min

Variations

Bar Cookies: Press dough onto bottom of ungreased 13 x 9-inch baking pan. Bake 30 to 35 minutes or until light golden brown. Cool completely in pan on wire rack. Cut into bars. Store tightly covered. 24 BARS. VARIATIONS: Stir in 1 cup chopped nuts. Substitute 1 cup semisweet chocolate chips or candy-coated chocolate pieces for raisins; omit cinnamon. Substitute 1 cup diced dried mixed fruit. HIGH ALTITUDE ADJUSTMENT: Increase flour to 1-3/4 cups and bake as directed.


Saturday, April 10, 2010

Guava Cake!!!

So Unfortunatly, I was such in a rush to get ready and get to my father-in-law's birthday party that I completely forgot to take a picture of my latest creation.  So this cake was made with guava.  My father in law loves guava.  When I dating my boyfriend (hubby now), I recall my father in law eating soda crackers with cheese and guava paste.  This is very cuban thing to do...lol.  I have never eaten it like this but I have had cuban guayaba pastelitos.  They are soooo good!!! If you're ever in Miami, FL, go to the nearest Vickey Bakery and get one. They sell one with cheese too! 

Well I used the following recipe from Alohaworld.com.  I didn't do the glaze because at first was going to cover the cake with fondant but then decided on just coating it with cream cheese frosting.  I also mixed the forsting with some guava marmelade for for the filling.  It was really good.  I just invented some stuff with this cake like the juice it calls for, I used Guava Nectar.  Not sure if this changed much but thought I mention it in case you wanted to try it.    Except for the actual cake recipe, I invented a few things that I thought would taste good and did!  My in laws and sister in law and her family loved it.  The cake was super moist too. 

I also cut out some fondant lettering for his name.  Says Happy Birthday in spanish and cut out some stars, tried to make it look cute. :) I tried to keep it simple. 


I am trying to do more cakes with fondant.  I love baking and I like that bakery-rustic look in the stuff I make-not sure if you know what I mean-so using fondant is not my forte.  I want to start using it more so I can get more practice.  Anyways, the cake was a hit and I hope you try it!  Tell me what you think if you make it? 

Tuesday, April 6, 2010

Cupcake Pops :0)~

So I decided to make the famous Cupcake Pops from Bakerella.com.  I made them during the Easter weekend.  They were super easy to make but did take some time. I think my were much thicker and bigger than Bakerella's.  For next time I will make them smaller.  LOL  I used Wilton White and Chocolate Bark and homemade Cream Cheese frosting from when I made the Carrot cake.  See Previous Blog.  I made three Carrot cakes for Easter so it worked out! 
I used various different sprinkles to coincide for the Easter Holiday!  I love Sprinkles. <3 Don't You?  :)

They made great treats for the kiddies and adults love them as well.  Tell me what you think?  Have you tried them yet?

Wednesday, March 17, 2010

Carrot Cake...OMGGGGG!

Amazing Carrot Cake!
 
 
I highly recommend that you make this cake ASAP!!!!  Okay so I saw this cake on the following blog:  Lovin' From the Oven.  She raved about the cake sooooo much that I decided to make it.  Let me tell you, this cake is AMAZING!  I have made Carrot Cake before but this one was so moist, sooooo good, so not too sweet, not too overpowering but OMG!  All I can say is OMG! 

So here's what I did.  I used fresh carrots for this.  I am guessing that you can use the carrots that come already shredded but I highly recommend shredding them yourself.    I bought a bag of carrots and just started shredding the old fashioned way with a grater.  I am sure there is a easier way but this is how my mom, grandmother, aunts...you get the picture did it and it brought back soooo many memories of when I helped my grandmother and mother cook.  I love memories! 

So After this I mixed everything up.... and it looks like this...and oh yeah,  I used the wooden spoon as per the recipe.
So after the mixing is done....ready to bake.  I used two 9 inch pans. 
30-40 Mins later.....TA-DA!  Oh and did I mention that it smells sooooo good! 

And after you put the frosting on the cake...it may look like this..YUMMY!


I love it!  My new favorite recipe!


OMG, Almost forgot to include the recipe:

Carrot Cake
•1 cup vegetable oil
•1/2 cup water
•2 cups AP flour
•2 tsp baking soda
•2 tsp baking powder
•2 tsp cinnamon
•3 cups shredded carrot
•1 cup chopped walnuts
•4 eggs
•2 cups sugar

Mix all ingredients well with a wooden spoon. Pour into desired pan and bake at 350 degrees for 40-50 minutes (more or less depending on pan size) until a toothpick comes out clean.


For the cream cheese frosting:
•8 oz cream cheese (only use Philadelphia brand!)
•1 cup powdered sugar
•2 tsp vanilla
•1/2 cup (1 stick) butter
•few drops of water
 
Beat all ingredients well and spread on top of cooled cake.
 

Thanks for checking it out!  Feel free to ask me anything or leave me comments!